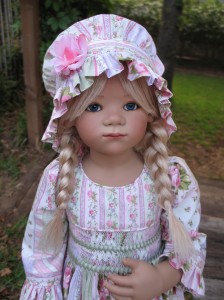
I have seen many examples of smocked garments with ribbon woven under and over the smocking stitches. The look of it appealed to me so I thought I would give it a try. Unfortunately, I forgot to take step by step pictures so all I have to show is the finished product. When choosing a smocking design for where the ribbon will be woven, just smock a zigzag . I used a full row between rows 4 & 5 and simply did a cable on row 4 and dropped down to row 5 and did another cable then back up to row 4 with a cable, etc.
Once the smocking was done, I found some ribbon that matched the fabric and was not wider than the distance between each row. I found this sage colored ribbon, shiny on both the back and front, that was 3/8 inch wide. The problem I had was judging how long to cut my ribbon before I began the weaving. After measuring the width of this doll dress bodice (about 11 inches) I tripled the length and cut a piece of ribbon 36 inches long. I left about an inch on the left, pinned that into the fabric seam allowance, and began weaving it through the zigzag.
I took the ribbon up under the first zig, and then brought it down over the floss and under the zag. While I was weaving the ribbon through, (up, over, under, etc.) I kept thinking that if I run out of ribbon I would have to start over with a longer piece! But, I wove the first ribbon through and had about a 3 inch tail so I cut the second piece 36 inches long and wove it through the bottom of the design. Here are pictures of the finished product:


 Now that I know I can do it, I plan to incorporate it into a dress for my granddaughter. I use the dolls as my testing ground before I make something for my granddaughter! Next month I am taking a class on ribbon weaving at the SAGA Convention in Frisco. I hope to learn tricks and techniques to do an even better job next time.